Educational Uses of Gyotaku or Fish Printing

Gyotaku is a traditional form of Japanese art that began over 100 years ago as a way for fishermen to keep a record of the fish they caught. They would apply sumi ink to one side of a freshly caught fish, then cover the fish with rice paper and rub to create an exact image of the fish. The ink was non-toxic and allowed for the fish to be processed for eating, while preserving records of fish species and sizes.
These utilitarian prints were incredibly life like. When done properly they retained even subtle patterns and textures of the fish. The relatively simple black ink prints later developed into an art form that added rich colors and environmental details.
For educators, Gyotaku (pronounced Gee-oh-tak-oo) can also serve as a great way to teach children and adults about basic fish anatomy. During the activity, you can talk to people about the fins, gills, eyes, and lateral line. For example you can discuss how people swim and compare that to how fish swim by creating propulsion with their caudal fin.
For a recent program here at the Smithsonian’s National Museum of Natural History, instead of real fish we used rubber replicas along with tempera paint. You can find the replicas online by doing a web search for "Gyotaku fish printing supplies". We applied the paint with paint brushes and then pressed basic white paper over the fish, making sure to hold the page steady while pressing and rubbing the paper. It does take some practice with getting the right amount of paint on the fish—too much and the print becomes blurry and smeared, too little and you don’t have enough to get a good transfer.
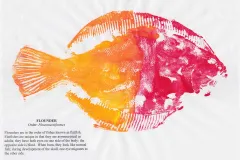
My favorite was the flounder print. While talking to the Museum visitor who was making the print, I explained how flounders swim with their bodies parallel to the bottom. I then explained that flounder, like all flatfish, have both eyes on one side of the body, while the opposite side is blind. When born, they look like normal fish and it is during the development of the skull that one eye migrates to the other side.
Another great way to provide more information is to make a “species identification card” that is attached to the print. In the photo at left, you can see one of our volunteers helping the visitor glue the card to his print. On the cards, I included the common name, the species or family name, and a few brief facts that include the fish’s habitat and range. If you are interested in doing this activity yourself, the Chesapeake Bay Program has a great list of the items you need and simple directions.
If you prefer to see a video on using a real fish Order Street Studio does a good job of showing you all the steps in stabilizing the fish and prepping the fish for printing. If you’re a teacher and are interested in information on possible standards a fish printing activity could fulfill, check out this lesson plan from the Allen Memorial Art Museum.


